Monday, December 26, 2011

A Bangin' Good Xmas Tree

My little guy loves any excuse to get out his tool box and hammer away at stuff, so I knew he'd especially like this Christmas tree craft!

SUPPLIES:
--green styrofoam cone
--assorted buttons
--assorted sequins
--small nails (or you could just use push pins)
--a silver pom-pom

GAME PLAN:
This one's pretty self explanatory; just helped Cohen hold the buttons in place while he hammered away! For the sequins he just pushed the nails in. I actually just used a piece of floral wire stuck into the top of the cone to attach the pom-pom.

Terra Cotta Snow Men

With a bit of help from me, my son made these cute snow men to give as presents at our family Christmas!
SUPPLIES:
--small terra cotta pots
--small white styrofoam balls 
--white acryllic paint (I used the Patio Paint made especially for terra cotta)
--glue (I used E6000)
--glitter glue
--brown and orange pipe cleaners
--socks (for hats and scarves)
--black marker
--scissors
--assorted buttons
--thin string

GAME PLAN:
My son painted all of the pots and styrofoam balls with the white paint, then I used the E6000 glue to attach the heads (balls) to the body (pots). After it dried thouroughly, Cohen painted glitter glue all over them to make them sparkle. Using the brown pipe cleaner, I cut and attached the arms by sticking them into the styrofoam where it meets the body. Then I made the hats by cutting about 4 inches off the ankle part of a pair of socks (I found that the hat stays on better if you use the elastic ankle part of the sock to fit around the head). Place the sock on the snowman's head and then use the string to tie it off at the top. I then used a pair of scissors to cut strips at the top to make the pom-pom. Using the remainder of the sock, cut out a small scarf to wrap around where the head meets the body, covering up where you stuck in the arms. Then, Cohen used a small piece of orange pipe cleaner to stick in for the nose and a marker to make the eyes and mouth. And finally, he glued on the buttons.


Friday, December 9, 2011

Ginger Bread House

Love the little prep required for this store bought Ginger Bread House!

After making our first ginger bread house together last year, I learned a valuable lesson and I "glued" the house together the night before so we wouldn't have a VERY impatient toddler waiting to decorate it while it dried!

The BEFORE picture: all glued together and ready to decorate!
The AFTER picture: All decorated!

Craft Stick Christmas Trees

Cute and super easy!
SUPPLIES:
--large craft sticks (for the tree trunks)
--skinny craft sticks (for the branches)
--wood snips
--paint
--glue (I used E6000 to glue the sticks together and regular craft glue for the sequins)
--yellow foam

GAME PLAN:

I prepared the sticks by using wood snips to cut the skinny craft sticks into branches of descending lengths. Next, Cohen painted all the branch sticks green and the the two trunk sticks brown.

After the painted sticks dried, I glued them together with the E6000 glue to form the Christmas tree. We let them dry overnight. The next day Cohen glued all of the sequins on the branches and I cut out a yellow foam star for him to glue on the top. I attached the string to the back so we could hang them on little suction cups on the back door.

Tuesday, December 6, 2011

Reindeer with Child's Hand Antlers

This one's super easy! Plus I love anything that uses my kid's hand prints!


SUPPLIES:
--small terra cotta pot
--red pom pom
--two googly eyes
--card stock
--glue (I used E6000)
--ribbon (optional)

GAME PLAN:
I traced my son's hands on the dark brown card stock and cut them out myself, since he's not able to really use scissors yet. Next we glued on the antlers (if using E6000 glue, you'll need to hold them on for a couple of minutes to really get them to stick). Next my son glued on the eyes, nose and the little light brown ears that I had cut out of scrap cardstock. Finally, since I thought it looked a bit "naked," we decided to add some colorful ribbon around the rim of the pot using the same E6000 glue. Pretty easy!

Monday, December 5, 2011

Thanksgiving Place Setting Treats

For Thanksgiving I made these really cute Indian Corn table place settings! They take a bit of effort but the results are worth it!

SUPPLIES:
--disposable plastic icing bags (I used Wilton bags)
--Woodsie Craft Circles - 1 1/4 in. diameter
--heavy duty double sided crafting tape
--scissors
--floral wire (preferably tan color, but I used green since that's all I had)
--wire snips
--raffia
--Reese's Pieces or fall colored M&M's
--card stock and paper to make name tags

GAME PLAN:
I'll use the pictures that follow to try to explain in detail the process I used, but you'll definitely need to find your own mojo in creating these:

First cut off about 3 inches from the tip of the icing bag. You want to cut off enough of the tip so that when you place the wooden circle inside the bag you'll have just about 1/4 inch of bag to fold over and tape down on the wooden circle. This is the most difficult part - manuevering the wooden circle into the bag because its tendency is to flip on you. But once you figure it out, it will go more smoothly.
Tape down the excess bag as flatly as possible. I used heavy duty double sided crafting adhesive, since regular double sided tape wasn't strong enough to hold. This picture shows 2 sides taped down; I still have to tape down the other 2 sides that you see sticking up.
Tape the second wooden circle to make a flat bottom.
Fill the bag with candy about 3 inches high or so.
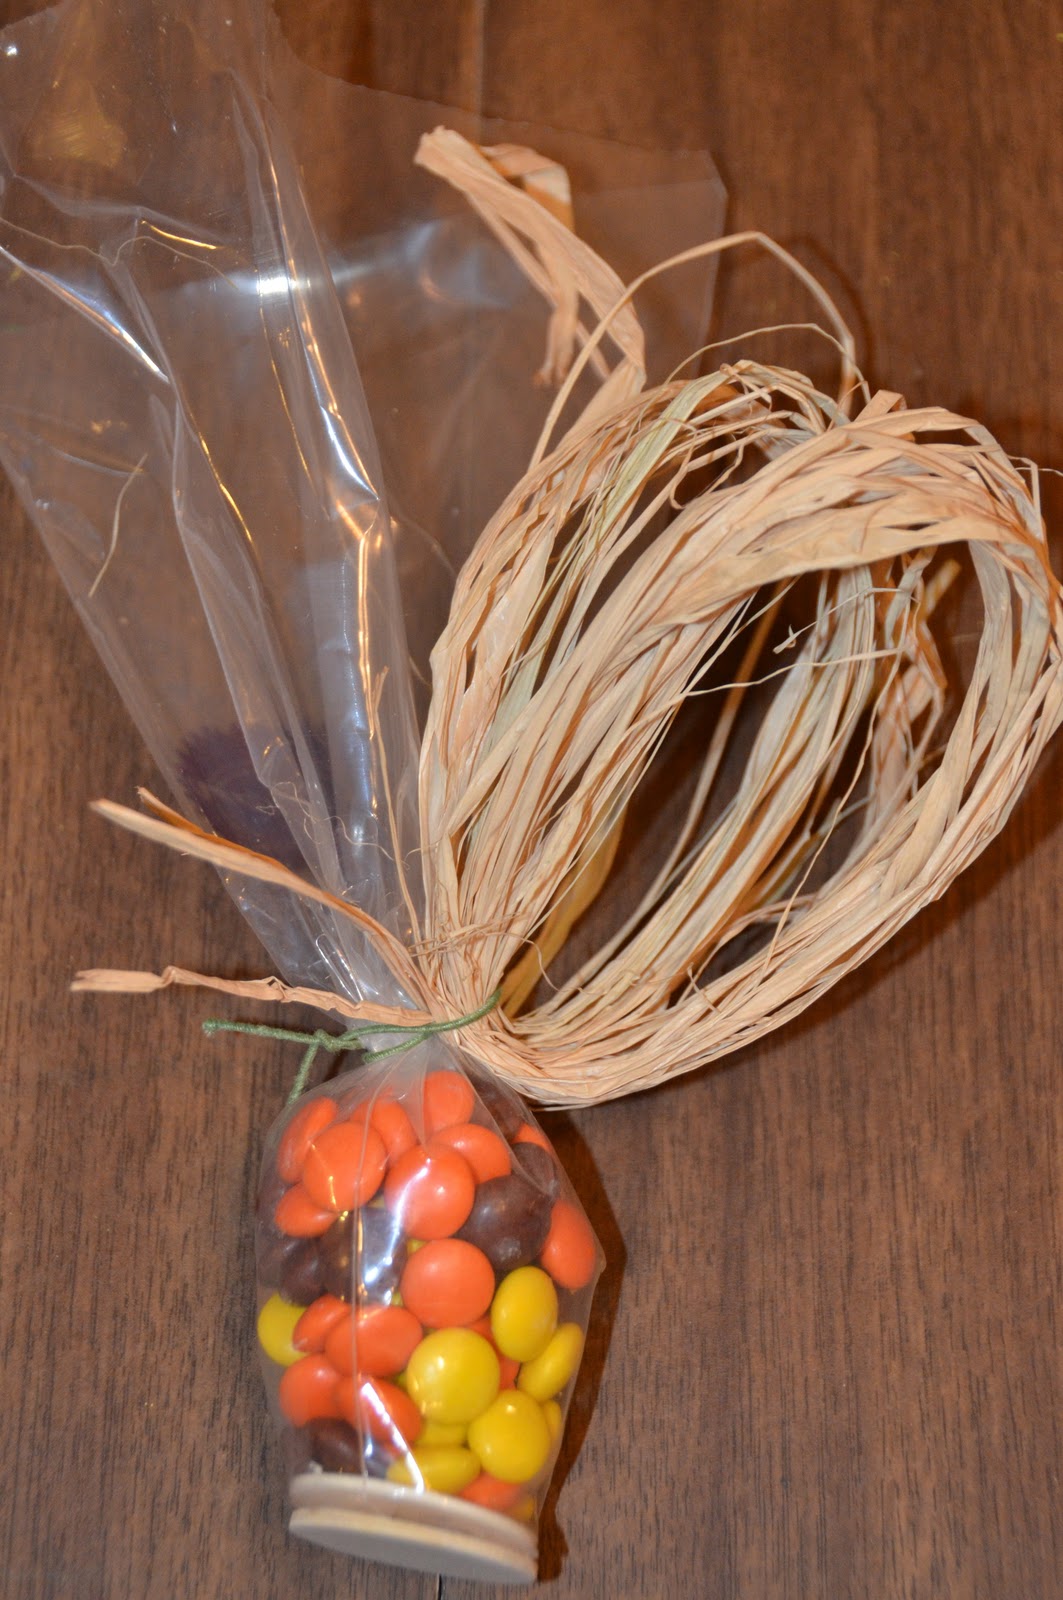
Tightly tie off with a generous length of floral wire.
Next, take about 4-5 long strands of raffia and wrap them tightly in a circle around your hand. Slip off the loop of raffia keeping it pinched together.
Keeping the raffia pinched together at the bottom, squeeze it together like shown below.
Using the excess floral wire that you used to tie off the bag, attach the raffia loop to the bag. Cut off the excess top of the icing bag leaving just about 3/4 inch above the wire.
Take another couple strands of raffia and wrap about the base of the "husks" covering up the floral wire and the excess bag at the top.
In this picture you see the excess icing bag has been cut off and I'm wrapping around the raffia to cover up the wire and the bit of bag that is exposed at the top.
Tie off the raffia and make a bow. Then cut the looped raffia at the top to finish the corn husks. Finally, you can attach a name card to each of the ears of corn to use as a place setting!

Thursday, November 17, 2011

Craft Stick Bracelets

These bracelets are pretty cute and easy to make, but be prepared to start a day in advance of when you want to decorate them.
SUPPLIES:
--large craft sticks
--drinking glass or votive holder
--whatever you want to use for decorations: paints, markers, buttons, fabric, etc

GAME PLAN:
Try to pick out the nicest, strongest looking craft sticks. Make sure they don't have any noticeable cracks or any weakened spots. Boil them in a pot of water for 15 minutes to make them pliable. Remove from the water and gently bend into a curve and place it in a glass container. The boiling makes them very susceptible to breaking and splintering (I lost 2 of the 6 that I boiled) which is why I suggest picking out the sturdiest looking ones to begin with. Really, the hardest part for me was finding the right size glass container to put them in. The one I put in the drinking glass made a bracelet that was large enough to fit my wrist, but would have been way to big for my 3 year old son's wrist. Finally I found a votive holder that curved the sticks small enough to fit his little wrist. Once the sticks are in place, let them dry completely over night. Then simply remove and decorate however you wish!

Here are the sticks drying in the glass and votive holder.
 Cohen gluing buttons to one of his bracelets!
 He decided to paint his other two bracelets!
 Our finished bracelets!

Monday, November 7, 2011

Melted Crayon Stained Glass Window Leaves

The results of this pretty fall craft were nice, but to be honest it took quite a bit longer and more effort than I anticipated.

SUPPLIES:
--construction paper or cardstock
--various leaf templates
--wax paper
--crayon shavings
--iron
--glue

GAME PLAN:
First, I printed and cut out various simple leaf patterns from the Internet (the more simple the better for easier cutting). Next, I cut out several squares of 5 x 5 inch cardstock (I decided to do 6 leaves, so I cut out 12 squares of cardstock - you need two pieces for each leaf).  I traced a leaf on the top sheet of each of the cardstock pairs. Firmly holding the two pieces of cardstock together, I cut out the leaf. It was fairly difficult to cut the cardstock because it was so thick, construction paper would definitely be easier to cut, but wouldn't be as sturdy. Next, came the crayon shaving. I found that a potato peeler worked best to shave the crayons, but I would definitely recommend using those big fat toddler crayons since it was really difficult to get shavings from the regular sized crayons (they kept snapping in two). Next, I cut approximately 5 inch squares of wax paper. Cohen sprinkled the shavings between two pieces of the wax paper and then he helped me iron (on a very low setting) it. Don't overdue the ironing; it melts very quickly! Also, a few crayon shavings go a LONG way! Don't put too many or they melt and run out of the wax paper. I would say about a half a teaspoon of shavings per leaf would be fine. After you've melted the crayon, glue the stained "glass" wax paper to one side of the cardstock and then glue the other leaf cut-out on top, lining up the leaf cut-outs.

Saturday, November 5, 2011

Child's Name on Painted Canvas

I don't know about other kids, but Cohen LOVES to paint, so I knew he'd love this one!

SUPPLIES:
--art canvas (whatever size you want)
--painters tape (not sure if regular masking tape would work, but I didn't want to chance it)
--paints (we just used washables)

GAME PLAN:
I used the painters tape to tape off Cohen's name and then just let him go to town painting all of the canvas. After it's dry, simply peel off the tape to reveal the white, paint-free name beneath. NOTE: if you take the tape off when it's mostly dry but not completely dry, you can use a wet wipe to still remove any smudges of paint that seeped beneath the edges of the painters tap; especially useful if you have a kid who likes to use A LOT of paint like mine does!

M&M "Gum Ball" Machine

Saw a super cute bright red gum ball machine on Pintrest, but of course Cohen wanted to paint his "all the colors!" HA! And we replaced gum balls with more Cohen-friendly M&M's!


SUPPLIES:
--terra cotta pot
--terra cotta dish
--small deocorative fish bowl
--wooden knob
--acrylic paints (work better than washable paints on terra cotta)
--ribbon
--E6000 glue (or something like that; needs to be able to glue together glass & terra cotta)

GAME PLAN:
This one's super easy! Just glue the glass bowl to the terra cotta pot (make sure when you are buying them that the diameters match) and glue the wooden knob onto the terra cotta dish. Let dry, paint and attach ribbon, fill with candy...voila! Easy!

Sun Catcher Window Art

I saw something similar to this on Pintrest and thought it was such a cute idea! Originally it was meant to be more of a temporary craft but I thought it would be neat to display Cohen's artwork in a more permanent manner, so I made a few adjustments! I think it turned out great! And it's really pretty when the sun is shining through the window!


SUPPLIES:
--cheap picture frames
--assorted transparent stones
--acrylic paints
--paint brushes
--clear drying glue
--a sponge paint brush
--permanent foam mounting tape

GAME PLAN:
I bought 6 frames from the Dollar Store (literally for $1 each) and several bags of the assorted transparent stones. If you aren't doing as many, you might want to get a little nicer frame that has a deeper space between the front of the frame and the glass. I took the back off of the frames leaving just the glass. I tried to glue the glass onto the frame but didn't have much luck. Honestly, I didn't try that hard because I knew that I would be mounting them to the window, but I'm sure something like E6000 glue would work. Next, I used a sponge paint brush to spread a medium thickness coat of glue on the outside glass (since the stones were thicker than the frame depth). Then came Cohen's part: sticking on all of the stones all over the glue. Then simply let dry!

Cohen glued stones to three of the frames and painted the other three with acrylic paints and paint brushes.

Finally I used Scotch 1/2 in. permanent mounting foam tape (holding up to 2 lbs.) to mount the frames to the windows. The original craft suggested glueing suction cups to the back of the frames to mount, but the frames with the stones were far too heavy to mount with only suction cups. Besides, I knew that I wanted them mounted more permanently.

Tuesday, November 1, 2011

Do I Really Need Another Blog???

Well, apparently the answer is a resounding YES! Two more, in fact! With my original blog The Jackson Family Blog being completely taken over by super cute pics of my super cute kids, I decided I needed a separate outlet for two of my other loves: artsy crafty stuff and a more editorial blog with my take on different social and current issues (kind of what my original blog started off as.) Not that anyone particularly cares what I have to say on these topics, but as a writer by nature, when I hear about something going on in the world, my first impulse it to write about it. So this blog, as the name implies, will be dedicated to all of my arts and crafts endeavors - all things crafty, so to speak! I've been getting a lot of fun and creative ideas from Pintrest, and Cohen and I have been having a blast trying them out! I hope to use this blog to showcase our crafts and perhaps inspire others as well! Hope you enjoy!